How to receive email with Next.js, the app router and Typescript
Next.js is a React framework that allows you to build static and server-side rendered applications. In this article, we'll explore how to send and receive email using CloudMailin and Next.js's API routes written in Typescript.
Before we get started I just want to address the App router vs the Pages router debate. We are going to use the App router in this article. Rather than picking a side it should be easy to adapt this code if you want to use the Pages router instead.
What is CloudMailin?
CloudMailin is an email service that allows you to receive email via a webhook and send transactional email via HTTP or SMTP. We're going to use CloudMailin to receive email, parse it and then send a quick reply. In future we will be persisting the email to a database and performing some more complex tasks that will be covered in another post.
Receiving an HTTP POST with Next.js
The first thing we need to do is create a new Next.js project. We can use the create-next-app CLI to do this.
npx create-next-app
With our app, we'll then create a new API route. This is where we'll receive the
HTTP POST and later the email via webhook. We want our API route to be at
/api/incoming_emails. With the pages router we can therefore create a file at
app/api/incoming_emails/route.ts:
// app/api/incoming_emails/route.ts
import { NextRequest, NextResponse } from "next/server";

export async function POST(request: NextRequest) {
  return NextResponse.json({ message: "Hello World" }, { status: 200 });
}
That's it! We can now run our app and test it out:
$ npm run dev
$ curl -i -X POST http://localhost:3000/api/incoming_emails
HTTP/1.1 200 OK
vary: RSC, Next-Router-State-Tree, Next-Router-Prefetch, Accept-Encoding
content-type: application/json
date: Fri, 28 Jul 2023 09:52:14 GMT
connection: close
transfer-encoding: chunked

{"message":"Hello World"}
Perfect, we've created our API route and we're ready to receive email.
Receiving email with Next.js via HTTP POST
Now that we've created our API route let's modify things slightly to receive an email via HTTP POST.
// app/api/incoming_emails/route.ts
import { NextRequest, NextResponse } from "next/server";

export async function POST(request: NextRequest) {
  let mail = await request.json();
  console.log(mail)

  return NextResponse.json({ message: "Thanks for the email" }, { status: 201 });
}
Here we've changed the status code to be 201 created and asked the function
to take the JSON from the request. Then we'll log the JSON that we receive to
the console and return a simple message.
In order to test this we'll use the CloudMailin Postman examples, which will mimic sending a full email to our API route.
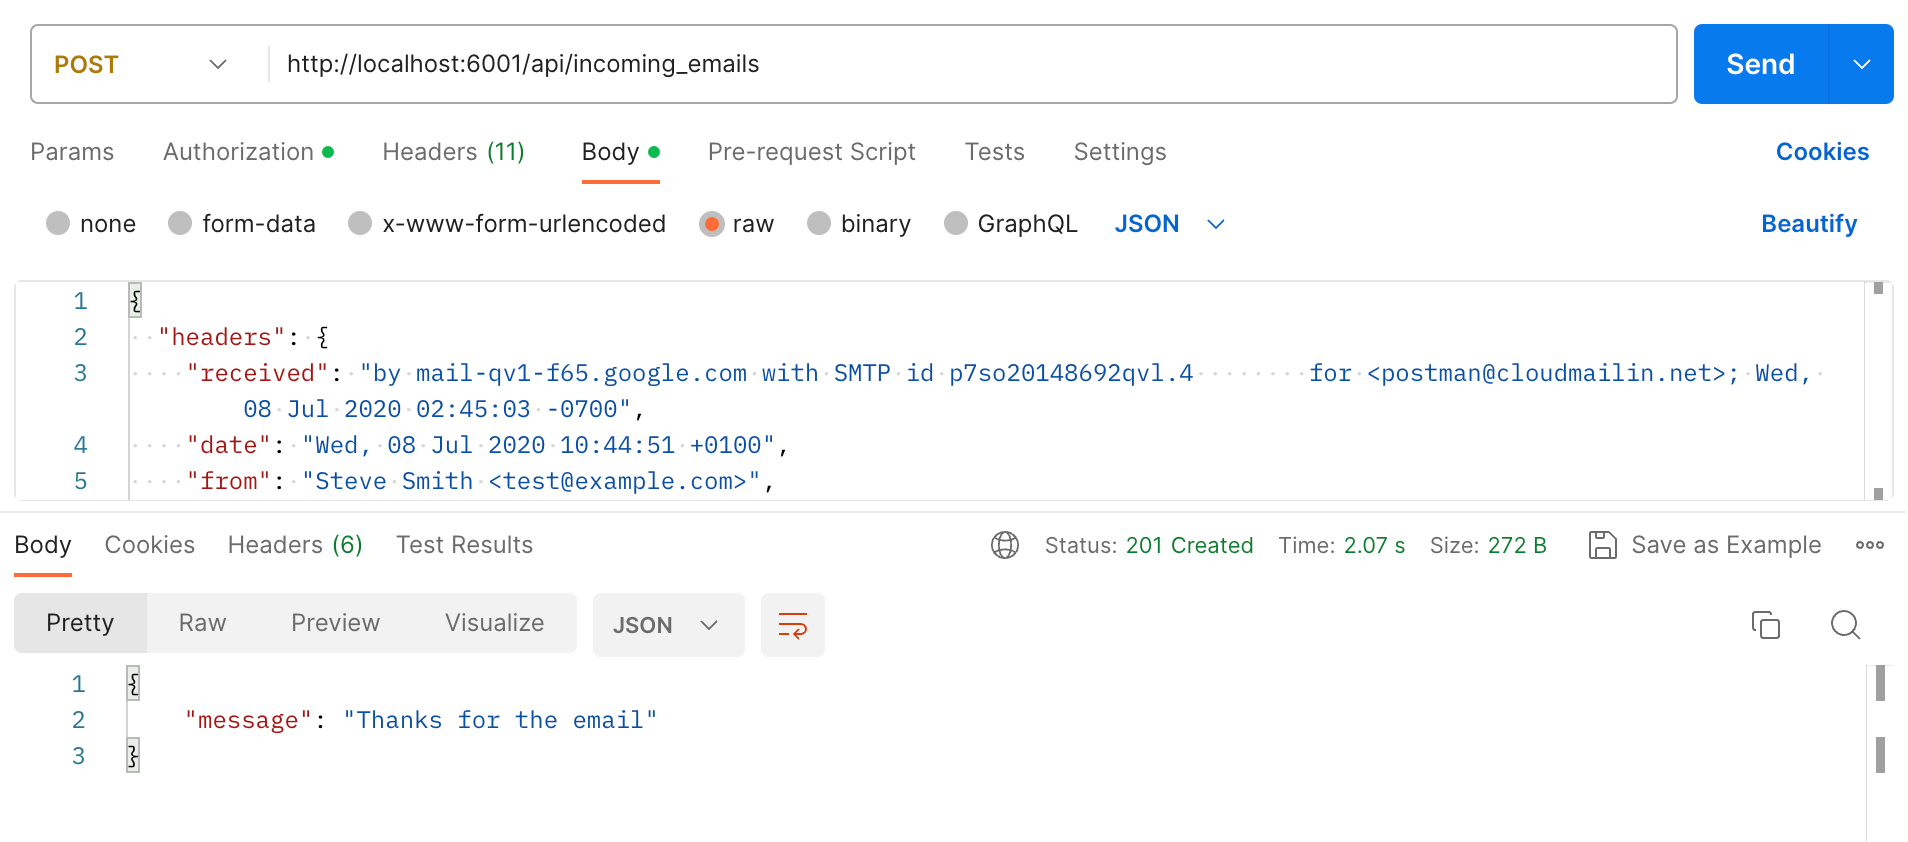
This time when we make the request we'll see "Thanks for the email" in the response and the console will have logged our parsed email JSON.
Typescript types and email helpers
In order to make our code a little easier to work with we can import the types from CloudMailin and use them in our code.
npm install --save cloudmailin
// app/api/incoming_emails/route.ts
import { NextRequest, NextResponse } from "next/server";
import { IncomingMail } from "cloudmailin";

export async function POST(request: NextRequest) {
  let mail: IncomingMail = await request.json();
  console.log(mail.plain);
  console.log(mail.html);
  console.log(mail.envelope.from);
  console.log(mail.envelope.to);

  return NextResponse.json(
    { message: `Thanks for the email ${mail.envelope.from}` },
    { status: 201 }
  );
}
This time when we call our API route we'll see the plain text and HTML versions along with the sender of the email and the to addresses that were received in the SMTP conversation (we call this the envelope).
Note that emails can have a plain or an HTML part or both. When you code a solution it's important to handle all of these scenarios. We have the option to parse plain content if only the HTML part is present; contact us for details.
We've also modified the code to return a message that includes the sender of the email.
Handling email errors and securing our API route
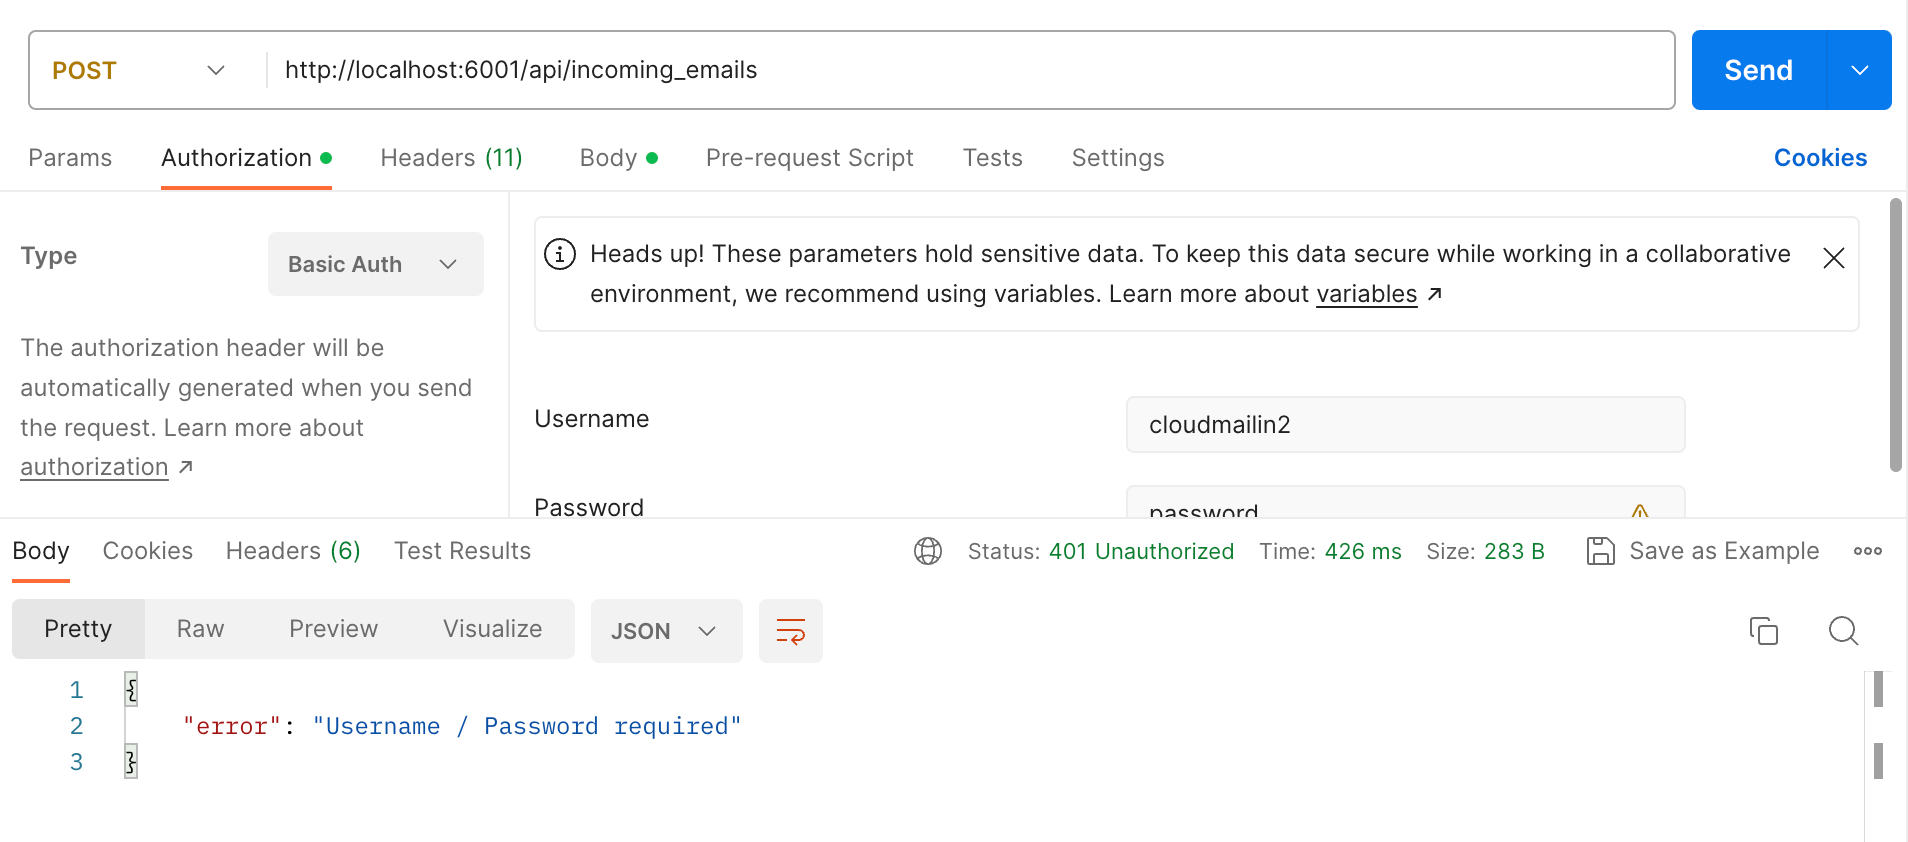
In order to ensure that only emails from CloudMailin can be received by our API, we're going to add basic authentication to our API endpoint. We're also going to wrap things in a try catch block to ensure that we can handle any errors that might occur.
Since we know that only CloudMailin can post to our API route we also know that it's safe to show the full error message in the HTTP response. By doing this the CloudMailin dashboard will show the error message and we can debug any issues that might occur.
When we return a status code other than a 2xx status (such as 403 or 500) then CloudMailin will store the response in the dashboard to aid debugging.
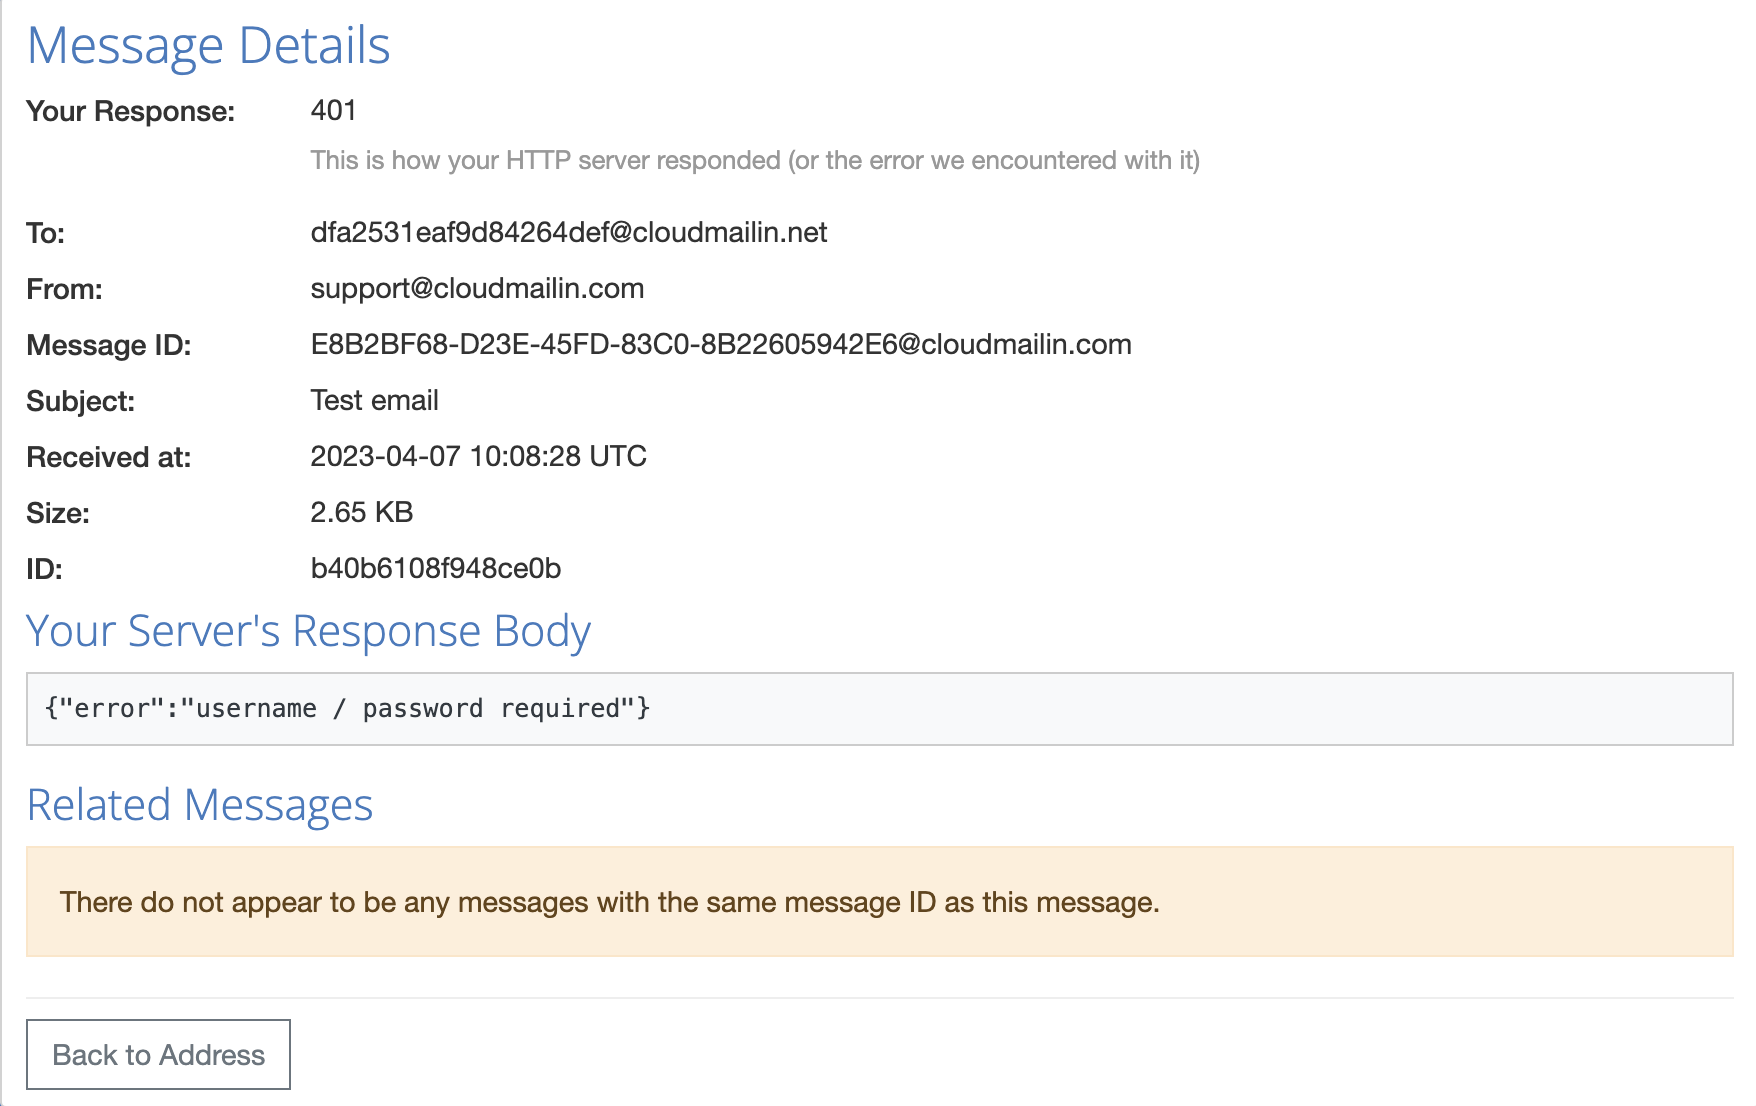
It's important to remember that basic authentication works well for HTTPS connections but shouldn't be considered secure over HTTP. This is just testing at present, but when we deploy we should make sure that we use HTTPS.
Our modified code looks like this:
// app/api/incoming_emails/route.ts
import { NextRequest, NextResponse } from "next/server";
import { IncomingMail } from "cloudmailin";

export async function POST(request: NextRequest) {
  try {
    if (!isAuthenticated(request)) {
      return NextResponse.json(
        { message: "Unauthorized" }, { status: 401 }
      );
    }

    let mail: IncomingMail = await request.json();
    await handleEmail(mail);

    return NextResponse.json(
      { message: `Thanks for the email ${mail.envelope.from}` },
      { status: 201 }
    );
  }
  catch (error) {
    return NextResponse.json(
      { message: `Error: ${error instanceof (Error) ? error.message : error}` },
      { status: 500 }
    );
  }
}
Here we've got a couple of different additions. Firstly we have an
isAuthenticated function to handle authentication. We'll implement that next.
We've also added a handleEmail function to handle the email and all of
the code is then wrapped in a try catch block.
The try catch block will output the details of any errors so that we can see them inside the CloudMailin dashboard.
We'll implement the isAuthenticated function next.
function isAuthenticated(request: NextRequest) {
  const authHeader = request.headers.get("Authorization");
  if (!authHeader || !authHeader.startsWith("Basic ")) {
    console.log("Authorization header not found");
    return false;
  }

  // use buffer to decode the base64 encoded string and compare
  const expectedPassword = process.env.PASSWORD || "cloudmailin:password";
  const headerValue = authHeader.slice("Basic ".length);
  const decHeader = Buffer.from(headerValue, "base64").toString("utf-8");
  console.log(`${expectedPassword} vs ${decHeader}`);

  return decHeader === expectedPassword;
}
This function looks for an Authorization header and then decodes the base64
encoded string. We then compare the decoded string with the password that we
expect. If they match we return true. Otherwise, we return false.
Handling email with Next.js
Now that we have the basics set up we can actually do something with the email content we receive with our Next.js application.
In order to do this we'll implement the handleEmail function that we created.
The function receives an instance of the IncomingMail class from CloudMailin.
We've made the function async so that we can perform any processsing that we may need and then return the HTTP response once this action has been performed. For simple cases this will work well. However, if we're doing anything more complex then it's recommended that we use a queue or some form of background processing to do the heavy lifting and we return quickly.
In our case we're going to use the handleEmail function to send a quick reply
for now to the sender of the email.
Sending email with Next.js and CloudMailin
In order to send email we're going to use the CloudMailin HTTP API (we could also use SMTP if preferred). We'll make use of the CloudMailin client library to make this easier.
The full documentation for the CloudMailin HTTP API can be found here: Sending email via JSON API. The CloudMailin client library is available on Github (cloudmailin/cloudmailin-js).
The code to send an email in Next.js can be found in the handleEmail function:
const userName = process.env.CLOUDMAILIN_USERNAME || "username";
const apiKey = process.env.CLOUDMAILIN_APIKEY || "apikey";

async function handleEmail(mail: IncomingMail) {
  console.log(`Received email from ${mail.headers.from} with subject: ` +
    mail.headers.subject);

  const client = new MessageClient({ username: userName, apiKey: apiKey });
  const response = await client.sendMessage({
    to: mail.headers.from,
    from: "auto-response@example.com",
    subject: "Thanks for your email",
    plain: `Thanks for your email: ${mail.headers.subject}` +
      `\n\nwe'll respond soon.`
  });

  return response;
}
In the above code we're taking the instance of the IncomingMail class and
using it to extract the subject and the sender of the email. We then use the
CloudMailin client library to send a simple email back to the sender.
The MessageClient class is a wrapper around the CloudMailin HTTP API and
will make the relevant calls to the API to send the email. Once the email has
been sent we'll return the response from the API. We can use this response
in order pass out the ID in the HTTP response.
The modified POST handler now looks something like this:
    let mail: IncomingMail = await request.json();
    const response = await handleEmail(mail);

    return NextResponse.json(
      {
        message: `Thanks for the email from ${mail.envelope.from} ` +
          `A response was sent as ` +
          `${response ? response.id : 'unable to send'}`
      },
      { status: 201 }
    );
This time when we make our request we'll see that the email has been sent and the ID of the email in the response.
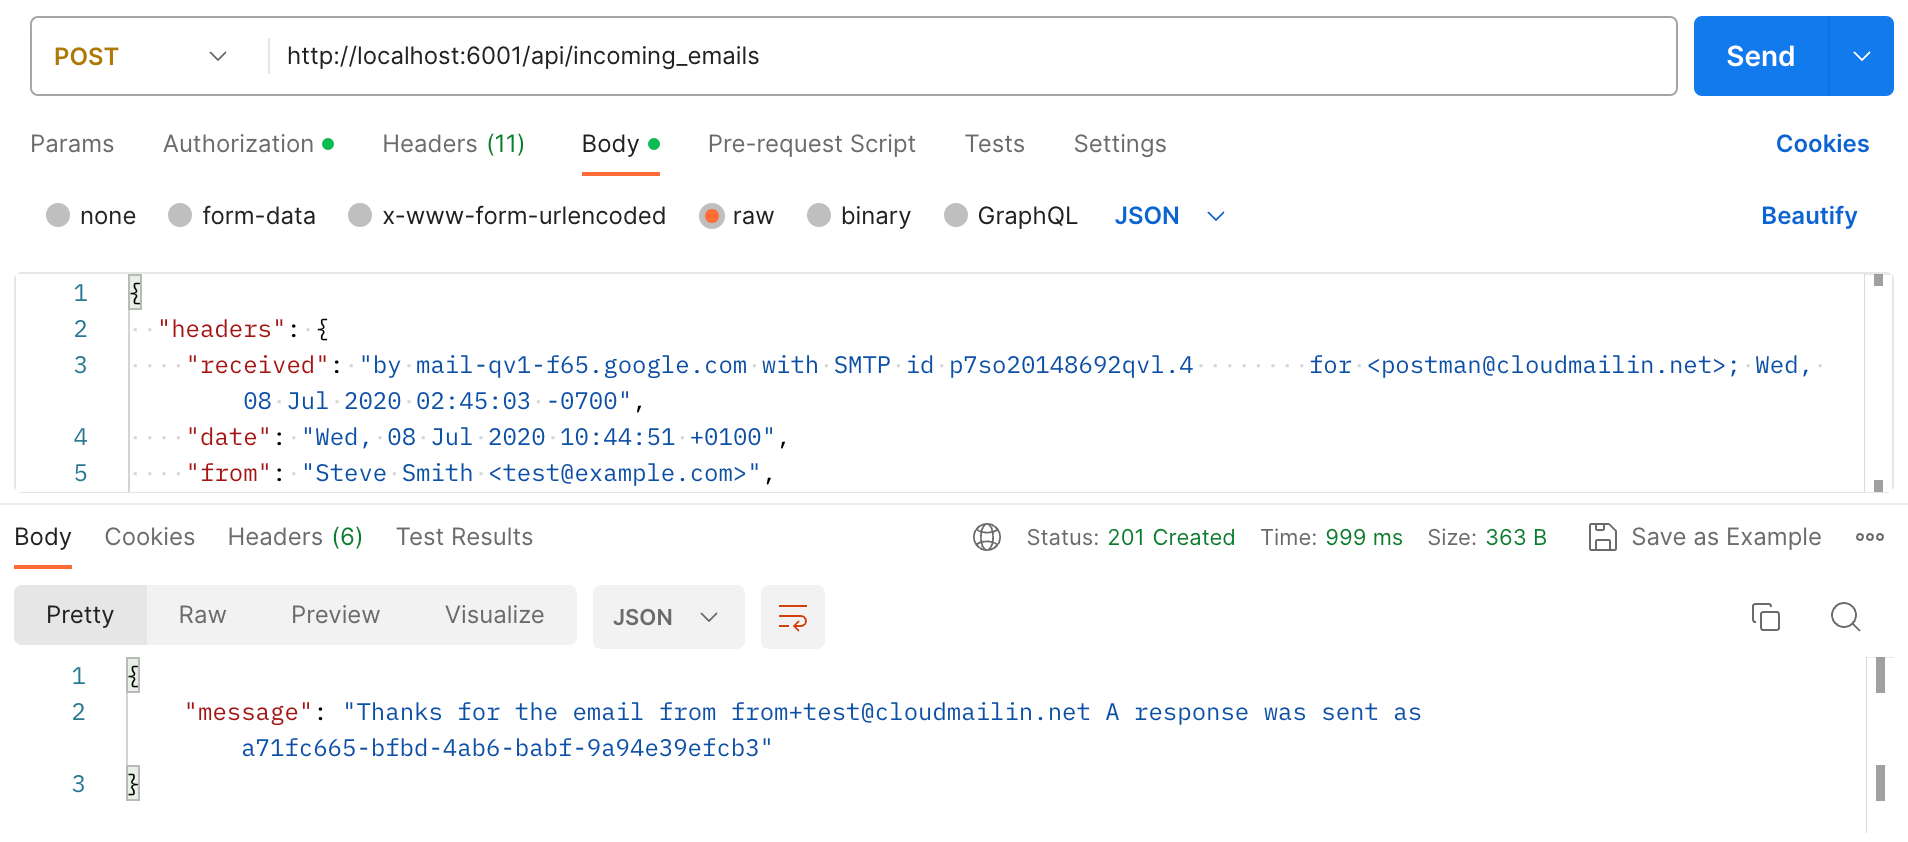
Again, any errors that occur can be handled by the try catch block and will be displayed in the CloudMailin dashboard.
Receiving a real email with Next.js
Now that we've got the basics working we can test with a real email. In order to
do this we'll need to deploy our application to a server that is accessible from
the internet. We can use Vercel or any other host to do this. Alternatively we
could use ngrok to expose our local development environment. Once we've deployed
our application we can then configure CloudMailin to send email to our API
route. This will mean specifying https://yourapp.com/api/incoming_emails as
the target webhook URL.
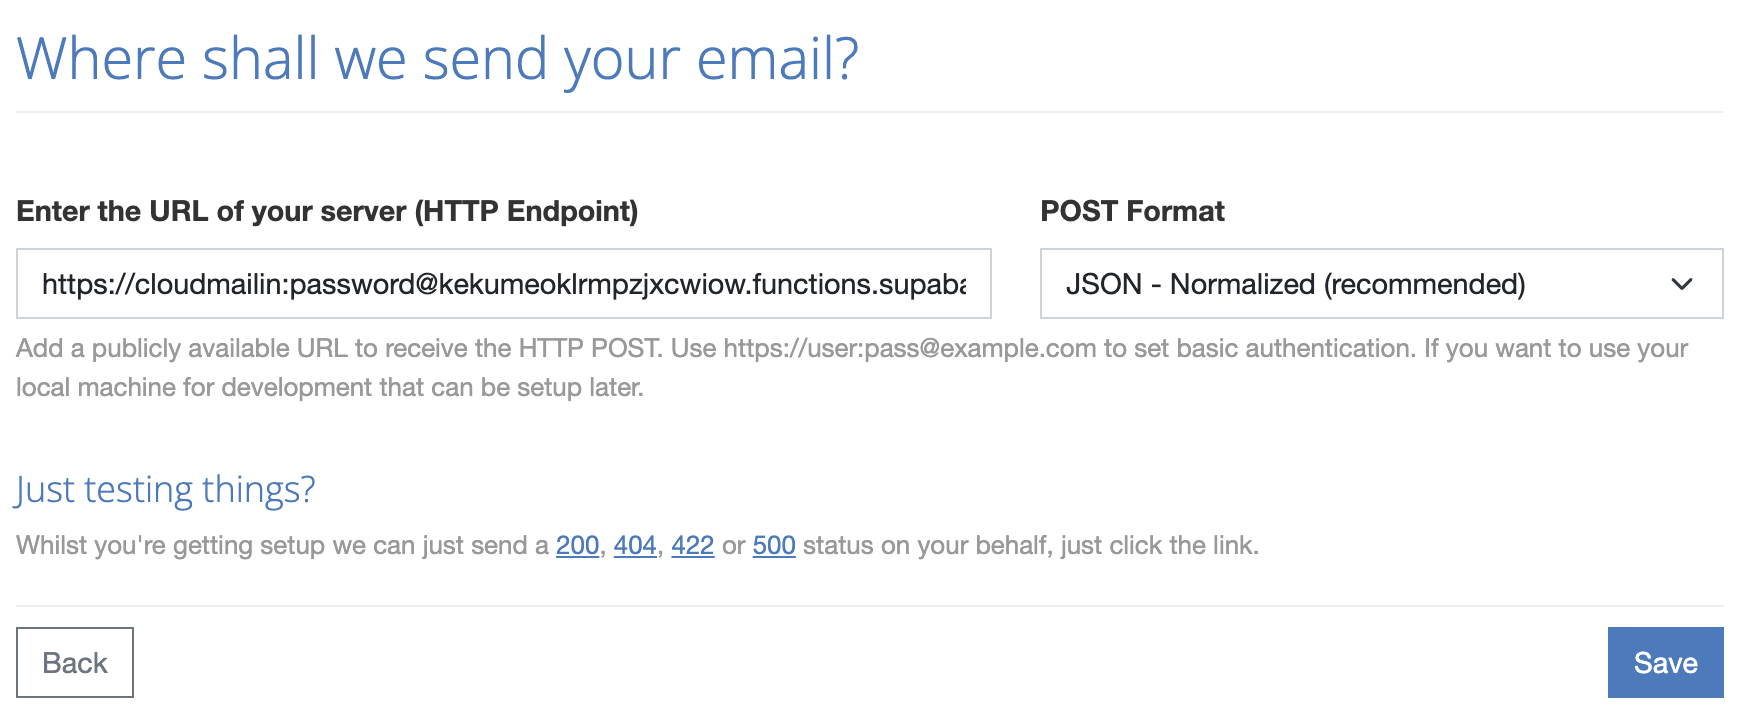
Remember to add your username and password to the CloudMailin target and to set your environment variables for the CloudMailin username and API key as you deploy.
The full code
Great! We've now got a working example of how to receive email with Next.js and we're all set up to send our inbound email to this app via webhook with CloudMailin. For completeness, here is the full code for our API route:
// app/api/incoming_emails/route.ts
import { NextRequest, NextResponse } from "next/server";
import { IncomingMail, MessageClient } from "cloudmailin";

const userName = process.env.CLOUDMAILIN_USERNAME || "cloudmailin";
const apiKey = process.env.CLOUDMAILIN_APIKEY || "apikey";
console.log(`Using ${userName} and ${apiKey}`);

export async function POST(request: NextRequest) {
  try {
    if (!isAuthenticated(request)) {
      return NextResponse.json(
        { message: "Unauthorized" },
        { status: 401 }
      );
    }

    let mail: IncomingMail = await request.json();
    const response = await handleEmail(mail);

    return NextResponse.json(
      {
        message: `Thanks for the email from ${mail.envelope.from} ` +
          `A response was sent as ` +
          `${response ? response.id : 'unable to send'}`
      },
      { status: 201 }
    );
  }
  catch (error) {
    return NextResponse.json(
      {
        message: `Error: ${error instanceof (Error) ? error.message : error
          }`
      },
      { status: 500 }
    );
  }
}

function isAuthenticated(request: NextRequest) {
  const authHeader = request.headers.get("Authorization");
  if (!authHeader || !authHeader.startsWith("Basic ")) {
    console.log("Authorization header not found");
    return false;
  }

  // use buffer to decode the base64 encoded string and compare
  const expectedPassword = process.env.PASSWORD || "cloudmailin:password";
  const headerValue = authHeader.slice("Basic ".length);
  const decHeader = Buffer.from(headerValue, "base64").toString("utf-8");
  console.log(`${expectedPassword} vs ${decHeader}`);

  return decHeader === expectedPassword;
}

async function handleEmail(mail: IncomingMail) {
  console.log(`Received email from ${mail.headers.from} with subject: ` +
    mail.headers.subject);

  const client = new MessageClient({ username: userName, apiKey: apiKey });
  const response = await client.sendMessage({
    to: mail.headers.from,
    from: "auto-response@example.com",
    subject: "Thanks for your email",
    plain: `Thanks for your email: ${mail.headers.subject}` +
      `\n\nwe'll respond soon.`
  });

  return response;
}
